For the summer semester 2020 we offered an elective class called Design Cyber Physical Systems. This time only few students enrolled into the class. The advantage of having small classes is that we can focus on a certain topic without loosing the overview during project execution. The class starts with a brain storming session to choose a topic to be worked on during the semester. There are only a few constraints which we ask to apply. The topic must have something to do with image processing, neural networks and deep learning. The students came up with five ideas and presented them to the instructor. The instructor commented on the ideas and evaluated them. Finally the students chose one of the idea to work on until the end of the semester.
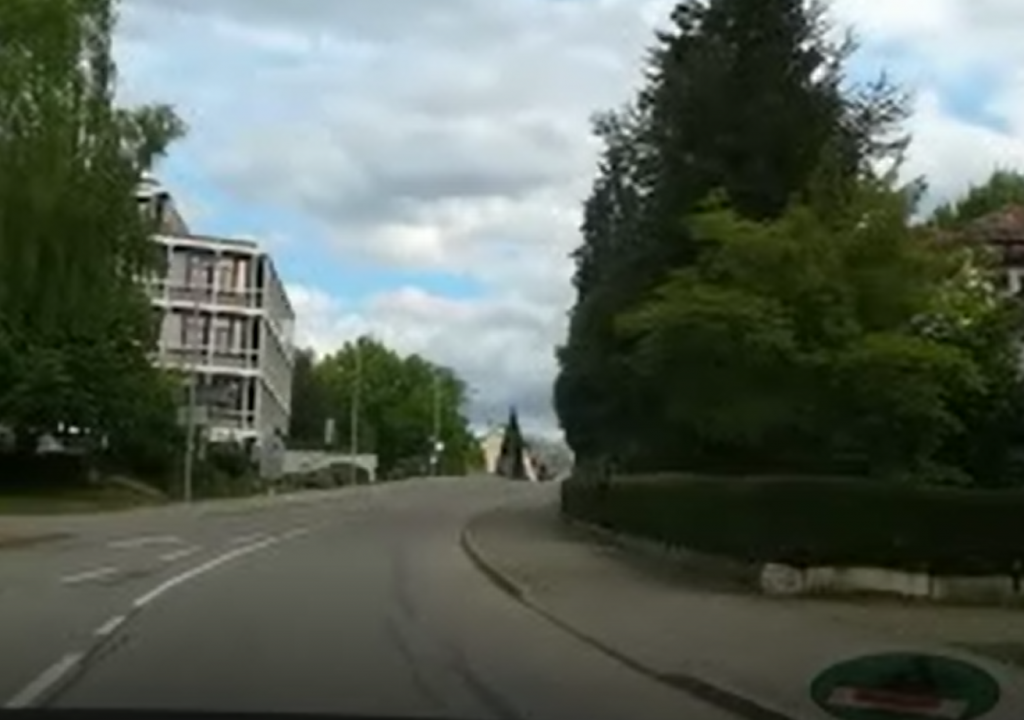
This time the students chose to process street scenes taken from videos while driving a car. A street scene can be seen in Figure 1. The videos were taken in driving direction through the front window of a car. The assignment the students have given to themselves is to extract street, street marking, traffic signs, and cars on the video images. This kind of problem is called semantic segmentation, which has been solved in a similar fashion as in the previous post. Therefore many functions in this post and in the last post are pretty similar.
Creating Training Data
The students took about ten videos while driving a car to create the training data. Since videos are just a sequence of images, they selected randomly around 250 images from the videos. Above we mentioned that we wanted to extract street, street marking, traffic signs and cars. These are four categories. There is another one, which is neither of those (or the background category). This makes it five categories. Below you find code of python dictionaries. The first is the dictionary classes which assigns text to the category numbers (such as the number 1 is assigned to Strasse (Street in English). The dictionary categories assigns it the way around. Finally the dictionary colors assigns a color to each category number.
classes = {"Strasse" : 1,
           "strasse" : 1,
          "Streifen" : 2,
           "streifen" : 2,
          "Auto" : 3,
          "auto" : 3,
          "Schild" : 4,
           "schild" : 4,
         }

categories = {1: "Strasse",
              2: "Streifen",
              3: "Auto",
              4: "Schild",
         }

colors = {0 : (0,0,0),
          1 : (0,0,255),
          2 : (0,255,0),
          3 : (255,0,0),
          4 : (0,255,255),
         }

dim = (256, 256)
To create training data we decided to use the tool labelme, which is described here. You can load images into the tool, and mark regions by drawing polygons around them, see Figure 2. The regions can be categorized with a names which are the same as from the python dictionary categories, see code above. You can save the polygons, its categories and the image itself to a json file. Now it is very easy to parse the json file with a python parser.

The image itself is stored in the json file in a base-64 representation. Here python has tools as well, to parse out the image. Videos generally do not store square images, so we need to convert them into a square image, which is better for training the neural network. We have written the following two functions to fulfill this task: makesquare2 and makesquare3. The difference of these functions is, that the first handles grayscale images and the second RGB images. Both functions just omits evenly the left and the right portion of the original video image to create a square image.
def makesquare2(img):

    assert(img.ndim == 2)

    edge = min(img.shape[0],img.shape[1])

    img_sq = np.zeros((edge, edge), 'uint8')

    if(edge == img.shape[0]):
        img_sq[:,:] = img[:,int((img.shape[1] - edge)/2):int((img.shape[1] - edge)/2)+edge]
    else:
        img_sq[:,:,:] = img[int((img.shape[0] - edge)/2):int((img.shape[0] - edge)/2)+edge,:]

    assert(img_sq.shape[0] == edge and img_sq.shape[1] == edge)

    return img_sq
def makesquare3(img):

    assert(img.ndim == 3)

    edge = min(img.shape[0],img.shape[1])

    img_sq = np.zeros((edge, edge, 3), 'uint8')

    if(edge == img.shape[0]):
        img_sq[:,:,:] = img[:,int((img.shape[1] - edge)/2):int((img.shape[1] - edge)/2)+edge,:]
    else:
        img_sq[:,:,:] = img[int((img.shape[0] - edge)/2):int((img.shape[0] - edge)/2)+edge,:,:]

    assert(img_sq.shape[0] == edge and img_sq.shape[1] == edge)

    return img_sq
Below you see two functions createMasks and createMasksAugmented. We need the functions to create training data from the json files, such as original images and mask images. Both functions have been described in the post before. Therefore we dig only into the differences.
In both functions you find a special handling for the category Strasse (Street in English). You can find it below the code snippet:
classes[shape[‘label’]] != classes[‘Strasse’]
Regions in the images, which are marked as Strasse (Street in English) can share the same region as Streifen (Street Marking in English) or Auto (Car in English). We do not want that street regions overrule the street marking or car regions, otherwise the street marking or the cars will disappear. For this we create first a separate mask mask_strasse. All other category masks are substracted from mask_strasse, and then mask_strasse is added to the finalmask. Again, we just want to make sure that the street marking mask and the other masks are not overwritten by the street mask.
def createMasks(sourcejsonsdir, destimagesdir, destmasksdir):

    assocf = open(os.path.join(path,"assoc_orig.txt"), "w")
    count = 0
    directory = sourcejsonsdir
    for filename in os.listdir(directory):
        if filename.endswith(".json"):
            print("{}:{}".format(count,os.path.join(directory, filename)))

            f = open(os.path.join(directory, filename))
            data = json.load(f)
            img_arr = data['imageData']
            imgdata = base64.b64decode(img_arr)

            img = cv2.imdecode(np.frombuffer(imgdata, dtype=np.uint8), flags=cv2.IMREAD_COLOR)

            assert (img.shape[0] > dim[0])
            assert (img.shape[1] > dim[1])

            finalmask = np.zeros((img.shape[0], img.shape[1]), 'uint8')

            masks=[]
            masks_strassen=[]
            mask_strasse = np.zeros((img.shape[0], img.shape[1]), 'uint8')

            for shape in data['shapes']:
                assert(shape['label'] in classes)

                vertices = np.array([[point[1],point[0]] for point in shape['points']])
                vertices = vertices.astype(int)

                rr, cc = polygon(vertices[:,0], vertices[:,1], img.shape)
                mask_orig = np.zeros((img.shape[0], img.shape[1]), 'uint8')

                mask_orig[rr,cc] = classes[shape['label']]
                if classes[shape['label']] != classes['Strasse']:
                    masks.append(mask_orig)
                else:
                    masks_strassen.append(mask_orig)

            for m in masks_strassen:
                mask_strasse += m

            for m in masks:
                _,mthresh = cv2.threshold(m,0,255,cv2.THRESH_BINARY_INV)
                finalmask = cv2.bitwise_and(finalmask,finalmask,mask = mthresh)
                finalmask += m

            _,mthresh = cv2.threshold(finalmask,0,255,cv2.THRESH_BINARY_INV)
            mask_strasse = cv2.bitwise_and(mask_strasse,mask_strasse, mask = mthresh)
            finalmask += mask_strasse

            img = makesquare3(img)
            finalmask = makesquare2(finalmask)

            img_resized = cv2.resize(img, dim, interpolation = cv2.INTER_NEAREST)
            finalmask_resized = cv2.resize(finalmask, dim, interpolation = cv2.INTER_NEAREST)

            filepure,extension = splitext(filename)

            cv2.imwrite(os.path.join(destimagesdir, "{}o.png".format(filepure)), img_resized)
            cv2.imwrite(os.path.join(destmasksdir, "{}o.png".format(filepure)), finalmask_resized)

            assocf.write("{:05d}o:{}\n".format(count,filename))
            assocf.flush()
            count += 1

        else:
            continue
    f.close()
In createMask you find the usage of makesquare3 and makesquare2, since the video images are not square. However we prefer to use square image for neural network training.
def createMasksAugmented(ident, sourcejsonsdir, destimagesdir, destmasksdir):

    assocf = open(os.path.join(path,"assoc_{}_augmented.txt".format(ident)), "w")

    count = 0
    directory = sourcejsonsdir
    for filename in os.listdir(directory):
        if filename.endswith(".json"):
            print("{}:{}".format(count,os.path.join(directory, filename)))

            f = open(os.path.join(directory, filename))
            data = json.load(f)

            img_arr = data['imageData']
            imgdata = base64.b64decode(img_arr)

            img = cv2.imdecode(np.frombuffer(imgdata, dtype=np.uint8), flags=cv2.IMREAD_COLOR)

            assert (img.shape[0] > dim[0])
            assert (img.shape[1] > dim[1])

            zoom = randint(75,90)/100.0
            angle = (2*random()-1)*3.0
            img_rotated = imutils.rotate_bound(img, angle)

            xf = int(img_rotated.shape[0]*zoom)
            yf = int(img_rotated.shape[1]*zoom)

            img_zoomed = np.zeros((xf, yf, img_rotated.shape[2]), 'uint8')
            img_zoomed[:,:,:] = img_rotated[int((img_rotated.shape[0]-xf)/2):int((img_rotated.shape[0]-xf)/2)+xf,int((img_rotated.shape[1]-yf)/2):int((img_rotated.shape[1]-yf)/2)+yf,:]


            finalmask = np.zeros((img_zoomed.shape[0], img_zoomed.shape[1]), 'uint8')
            mthresh = np.zeros((img_zoomed.shape[0], img_zoomed.shape[1]), 'uint8')
            masks=[]
            masks_strassen=[]
            mask_strasse = np.zeros((img_zoomed.shape[0], img_zoomed.shape[1]), 'uint8')

            for shape in data['shapes']:
                assert(shape['label'] in classes)

                vertices = np.array([[point[1],point[0]] for point in shape['points']])
                vertices = vertices.astype(int)

                rr, cc = polygon(vertices[:,0], vertices[:,1], img.shape)
                mask_orig = np.zeros((img.shape[0], img.shape[1]), 'uint8')
                mask_orig[rr,cc] = classes[shape['label']]

                mask_rotated = imutils.rotate_bound(mask_orig, angle)

                mask_zoomed = np.zeros((xf, yf), 'uint8')
                mask_zoomed[:,:] = mask_rotated[int((img_rotated.shape[0]-xf)/2):int((img_rotated.shape[0]-xf)/2)+xf,int((img_rotated.shape[1]-yf)/2):int((img_rotated.shape[1]-yf)/2)+yf]

                if classes[shape['label']] != classes['Strasse']:
                    masks.append(mask_zoomed)
                else:
                    masks_strassen.append(mask_zoomed)

            for m in masks_strassen:
                mask_strasse += m

            for m in masks:
                _,mthresh = cv2.threshold(m,0,255,cv2.THRESH_BINARY_INV)
                finalmask = cv2.bitwise_and(finalmask,finalmask,mask = mthresh)
                finalmask += m

            _,mthresh = cv2.threshold(finalmask,0,255,cv2.THRESH_BINARY_INV)
            mask_strasse = cv2.bitwise_and(mask_strasse,mask_strasse, mask = mthresh)
            finalmask += mask_strasse

            # contrast-> alpha: 1.0 - 3.0; brightness -> beta: 0 - 100
            alpha = 0.8 + 0.4*random();
            beta = int(random()*15)

            img_adjusted = cv2.convertScaleAbs(img_zoomed, alpha=alpha, beta=beta)


            img_adjusted = makesquare3(img_adjusted)
            finalmask = makesquare2(finalmask)

            img_resized = cv2.resize(img_adjusted, dim, interpolation = cv2.INTER_NEAREST)
            finalmask_resized = cv2.resize(finalmask, dim, interpolation = cv2.INTER_NEAREST)

            filepure,extension = splitext(filename)

            if randint(0,1) == 0:
                cv2.imwrite(os.path.join(destimagesdir, "{}{}.png".format(filepure, ident)), img_resized)
                cv2.imwrite(os.path.join(destmasksdir, "{}{}.png".format(filepure, ident)), finalmask_resized)
            else:
                cv2.imwrite(os.path.join(destimagesdir, "{}{}.png".format(filepure, ident)), cv2.flip(img_resized,1))
                cv2.imwrite(os.path.join(destmasksdir, "{}{}.png".format(filepure, ident)), cv2.flip(finalmask_resized,1))

            assocf.write("{:05d}:{}\n".format(count, filename))
            assocf.flush()
            count += 1

        else:
            continue
    f.close()
The function createMasksAugmented above does basically the same thing as createMasks, but the image is randomly zoomed and rotated. Also the brightness and contrast is randomly adjusted. The purpose is to create more varieties of images from the original image for regularization.
The original images and mask images for neural network training can be generated by calling the functions below. In the directory fullpathjson you find the source json files. The parameters fullpathimages and fullpathmasks are the directory names for the destination.
Since we labeled 250 video images and stored them to json files, the functions below create altogether 1000 original and mask images. The function createMasksAugmented can be called even more often for more data.
createMasks(fullpathjson, fullpathimages, fullpathmasks)
createMasksAugmented("a4",fullpathjson, fullpathimages, fullpathmasks)
createMasksAugmented("a5",fullpathjson, fullpathimages, fullpathmasks)
createMasksAugmented("a6",fullpathjson, fullpathimages, fullpathmasks)
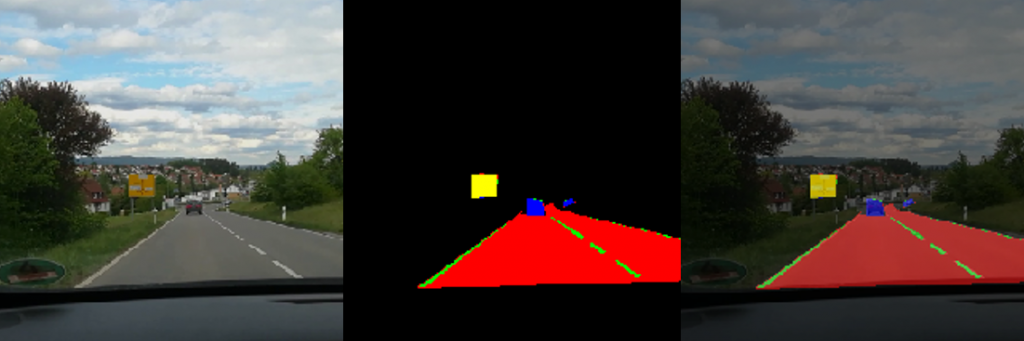
In Figure 3 below you find one result of the applied createMasks function. Left, there is an original image. In the middle there is the corresponding mask image. On the right there is the overlaid image. The region of the traffic sign is marked yellow, the street has color red, the street marking is in green and finally the car has a blue color.
Training the model
We used different kinds of UNET models and compared the results from them. The UNET model from the previous post had mediocre results. For this reason we switched to an UNET model from a different author. It can be found here. The library keras_segmentation gave us much better predictions. However we do not have so much control over the model itself, for this was the reason we created our own UNET model, but we were inspired by keras_segmentation.
Above we already stated that we have five categories. Each category gets a number and a color assigned. The assignment can be seen in the python dictionary below.
colors = {0 : (0,0,0),
          1 : (0,0,255),
          2 : (0,255,0),
          3 : (255,0,0),
          4 : (0,255,255),
         }


dim = (256, 256)
The UNET model we created is shown in the code below. It consists of a contracting and an expanding path. In the expanding path we have five convolution operations, followed by batch normalizations, relu-activations and maxpoolings. In between we also use dropouts for regularization. The results of these operations are saved into variables (c0, c1, c2, c3, c4). In the expanding path we implemented the upsampling operations and concatenate their outputs with the variables (c0, c1, c2, c3, c4) from the contracting path. Finally the code performs a softmax operation.
In general the concatenation of the outputs with the variables show benefits during training. Gradients of upper layers often vanish during the backpropagation operation. Concatenation is the method to prevent this behavior. However if this is really the case here has not been proofed.
def my_unet(classes):

    dropout = 0.4
    input_img = Input(shape=(dim[0], dim[1], 3))

    #contracting path
    x = (ZeroPadding2D((1, 1)))(input_img)
    x = (Conv2D(64, (3, 3), padding='valid'))(x)
    x = (BatchNormalization())(x)
    x = (Activation('relu'))(x)
    x = (MaxPooling2D((2, 2)))(x)
    c0 = Dropout(dropout)(x)

    x = (ZeroPadding2D((1, 1)))(c0)
    x = (Conv2D(128, (3, 3),padding='valid'))(x)
    x = (BatchNormalization())(x)
    x = (Activation('relu'))(x)
    x = (MaxPooling2D((2, 2)))(x)
    c1 = Dropout(dropout)(x)

    x = (ZeroPadding2D((1, 1)))(c1)
    x = (Conv2D(256, (3, 3), padding='valid'))(x)
    x = (BatchNormalization())(x)
    x = (Activation('relu'))(x)
    x = (MaxPooling2D((2, 2)))(x)
    c2 = Dropout(dropout)(x)

    x = (ZeroPadding2D((1, 1)))(c2)
    x = (Conv2D(256, (3, 3), padding='valid'))(x)
    x = (BatchNormalization())(x)
    x = (Activation('relu'))(x)
    x = (MaxPooling2D((2, 2)))(x)
    c3 = Dropout(dropout)(x)

    x = (ZeroPadding2D((1, 1)))(c3)
    x = (Conv2D(512, (3, 3), padding='valid'))(x)
    c4 = (BatchNormalization())(x)

    #expanding path
    x = (UpSampling2D((2, 2)))(c4)
    x = (concatenate([x, c2], axis=-1))
    x = Dropout(dropout)(x)
    x = (ZeroPadding2D((1, 1)))(x)
    x = (Conv2D(256, (3, 3), padding='valid', activation='relu'))(x)
    e4 = (BatchNormalization())(x)

    x = (UpSampling2D((2, 2)))(e4)
    x = (concatenate([x, c1], axis=-1))
    x = Dropout(dropout)(x)
    x = (ZeroPadding2D((1, 1)))(x)
    x = (Conv2D(256, (3, 3), padding='valid', activation='relu'))(x)
    e3 = (BatchNormalization())(x)

    x = (UpSampling2D((2, 2)))(e3)
    x = (concatenate([x, c0], axis=-1))
    x = Dropout(dropout)(x)
    x = (ZeroPadding2D((1, 1)))(x)
    x = (Conv2D(64, (3, 3), padding='valid', activation='relu'))(x)
    x = (BatchNormalization())(x)

    x = (UpSampling2D((2, 2)))(x)
    x = Conv2D(classes, (3, 3), padding='same')(x)

    x = (Activation('softmax'))(x)

    model = Model(input_img, x)

    return model
As described in the last post, we use for training a different kind of mask representation than the masks created by createMasks. In our case, the UNET model needs masks in the shape 256x256x5. The function createMasks creates masks in shape 256×256 though. For training it is preferable to have one layer for each category. This is why we implemented the function makecolormask. It is the same function as described in the last post, but it is optimized and performs better. See code below.
def makecolormask(mask):
    ret_mask = np.zeros((mask.shape[0], mask.shape[1], len(colors)), 'uint8')

    for col in range(len(colors)):
        ret_mask[:, :, col] = (mask == col).astype(int)

    return ret_mask
Below we define callback functions for the training period. The callback function EarlyStopping stops the training after ten epoch if there is no improvement concerning validation loss. The callback function ReduceLROnPlateau reduces the learning rate if there is no improvement concerning validation loss after three epochs. And finally the callback function ModelCheckpoint creates a checkpoint from the UNET model’s weights, as soon as an improvement of the validation loss has been calculated.
modeljsonname="model-chkpt.json"
modelweightname="model-chkpt.h5"

callbacks = [
    EarlyStopping(patience=10, verbose=1),
    ReduceLROnPlateau(factor=0.1, patience=3, min_lr=0.00001, verbose=1),
    ModelCheckpoint(os.path.join(path, dirmodels,modelweightname), verbose=1, save_best_only=True, save_weights_only=True)
]
The code below is used to load batches of original images and mask images into lists, which are fed into the training process. The function generatebatchdata has been described last post, so we omit the description since it is nearly identical.
def generatebatchdata(batchsize, fullpathimages, fullpathmasks):

    imagenames = os.listdir(fullpathimages)
    imagenames.sort()

    masknames = os.listdir(fullpathmasks)
    masknames.sort()

    assert(len(imagenames) == len(masknames))

    for i in range(len(imagenames)):
        assert(imagenames[i] == masknames[i])

    while True:
        batchstart = 0
        batchend = batchsize

        while batchstart < len(imagenames):

            imagelist = []
            masklist = []

            limit = min(batchend, len(imagenames))

            for i in range(batchstart, limit):
                if imagenames[i].endswith(".png"):
                    imagelist.append(cv2.imread(os.path.join(fullpathimages,imagenames[i]),cv2.IMREAD_COLOR ))
                if masknames[i].endswith(".png"):
                    masklist.append(makecolormask(cv2.imread(os.path.join(fullpathmasks,masknames[i]),cv2.IMREAD_UNCHANGED )))


            train_data = np.array(imagelist, dtype=np.float32)
            train_mask= np.array(masklist, dtype=np.float32)

            train_data /= 255.0

            yield (train_data,train_mask)

            batchstart += batchsize
            batchend += batchsize
The variables generate_train and generate_valid are instantiated from generatebatchdata below. We use a batch size of two. We had trouble with a breaking the training process, as soon as the batch size was too large. We assume it is because of memory overflow in the graphic card. Setting it to a lower number worked fine. The method fit_generator starts the training process. The training took around ten minutes on a NVIDIA 2070 graphic card. The accuracy has reached 98% and the validation accuracy has reached 94%. This is pretty much overfitting, however we are aware, that we have very few images to train. Originally we created only 250 masks from the videos in the beginning. The rest of the training data resulted from data augmentation.
generator_train = generatebatchdata(2, fullpathimages, fullpathmasks)
generator_valid = generatebatchdata(2, fullpathimagesvalid, fullpathmasksvalid)
model.fit_generator(generator_train,steps_per_epoch=700, epochs=10, callbacks=callbacks, validation_data=generator_valid, validation_steps=100)
After training we saved the model. First the model structure is saved to a json file. Second the weights are saved by using the save_weights method.
model_json = model.to_json()
with open(os.path.join(path, dirmodels,modeljsonname), "w") as json_file:
    json_file.write(model_json)

model.save_weights(os.path.join(path, dirmodels,modelweightname))
The predict method of the model predicts masks from original images. It returns a list of masks, see code below. The parameter test_data is a list of original images.
predictions_test = model.predict(test_data, batch_size=1, verbose=1)
The masks in predictions_test from the model prediction have a 256x256x5 shape. Each layer represents a category. It is not convenient to display this mask, so predictedmask converts it back to a 256×256 representation. The code below shows predictedmask.
def predictedmask(masklist):
    y_list = []
    for mask in masklist:
        assert mask.shape == (dim[0], dim[1], len(colors))
        imgret = np.zeros((dim[0], dim[1]), np.uint8)

        imgret = mask.argmax(axis=2)

        y_list.append(imgret)

    return y_list
Another utility function for display purpose is makemask, see code below. It converts 256×256 mask representation to a color mask representation by using the python dictionary colors. Again this is a function from last post, however optimized for performance.
def makemask(mask):
    ret_mask = np.zeros((mask.shape[0], mask.shape[1], 3), 'uint8')

    for col in range(len(colors)):
        layer = mask[:, :] == col
        ret_mask[:, :, 0] += ((layer)*(colors[col][0])).astype('uint8')
        ret_mask[:, :, 1] += ((layer)*(colors[col][1])).astype('uint8')
        ret_mask[:, :, 2] += ((layer)*(colors[col][2])).astype('uint8')

    return ret_mask
In Figure 4 you find one prediction from an original image. The original image is on the left side. The predicted mask in the middle, and the combined image on the right side.
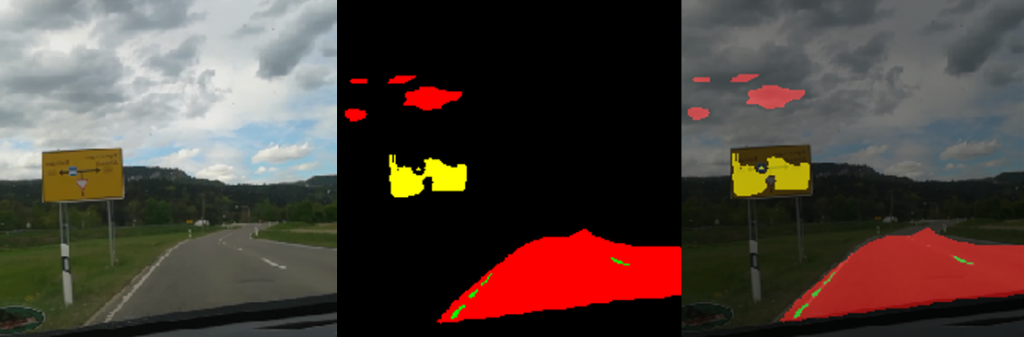
You can see that the street was recognized pretty well, however parts of the sky was taken as a street as well. The traffic sign was labeled too, but not completely. As mentioned before we assume that we should have much more training data, to get better results.
Creating an augmented video
The code below creates an augmented video from an original video the students made in the beginning of the project. The name of the original video is video3.mp4. The name of the augmented video is videounet-3-drop.mp4. The method read of VideoCapture reads in each single images from video3.mp4 and stores them into the local variable frame. The image in frame is normalized and the mask image is predicted. The function predictedmask converts the mask into a 256×256 representation, and the function makemask creates a color image from it. Finally frame and the color mask are overlaid and saved to the new augmented video videounet-3-drop.mp4.
cap = cv2.VideoCapture(os.path.join(path,"videos",'video3.mp4'))
if (cap.isOpened() == True):

    print("Opening video stream or file")
    out = cv2.VideoWriter(os.path.join(path,"videos",'videounet-3-drop.mp4'),cv2.VideoWriter_fourcc(*'MP4V'), 25, (256,256))
    while(cap.isOpened()):
        ret, frame = cap.read()

        if ret == False:
            break

        test_data = []
        test_data.append(frame)
        test_data = np.array(test_data, dtype=np.float32)
        test_data /= 255.0

        predicted = model.predict(test_data, batch_size=1, verbose=0)
        assert(len(predicted) == 1)
        pmask = predictedmask(predicted)

        if ret == True:

            mask = makemask(pmask[0])

            weighted = np.zeros((dim[0], dim[1], 3), 'uint8')
            cv2.addWeighted(frame, 0.6, mask, 0.4, 0, weighted)


            out.write(weighted)
            cv2.imshow('Frame',weighted)
            if cv2.waitKey(25) & 0xFF == ord('q'):
                break

    out.release()

cap.release()
cv2.destroyAllWindows()
Conclusion
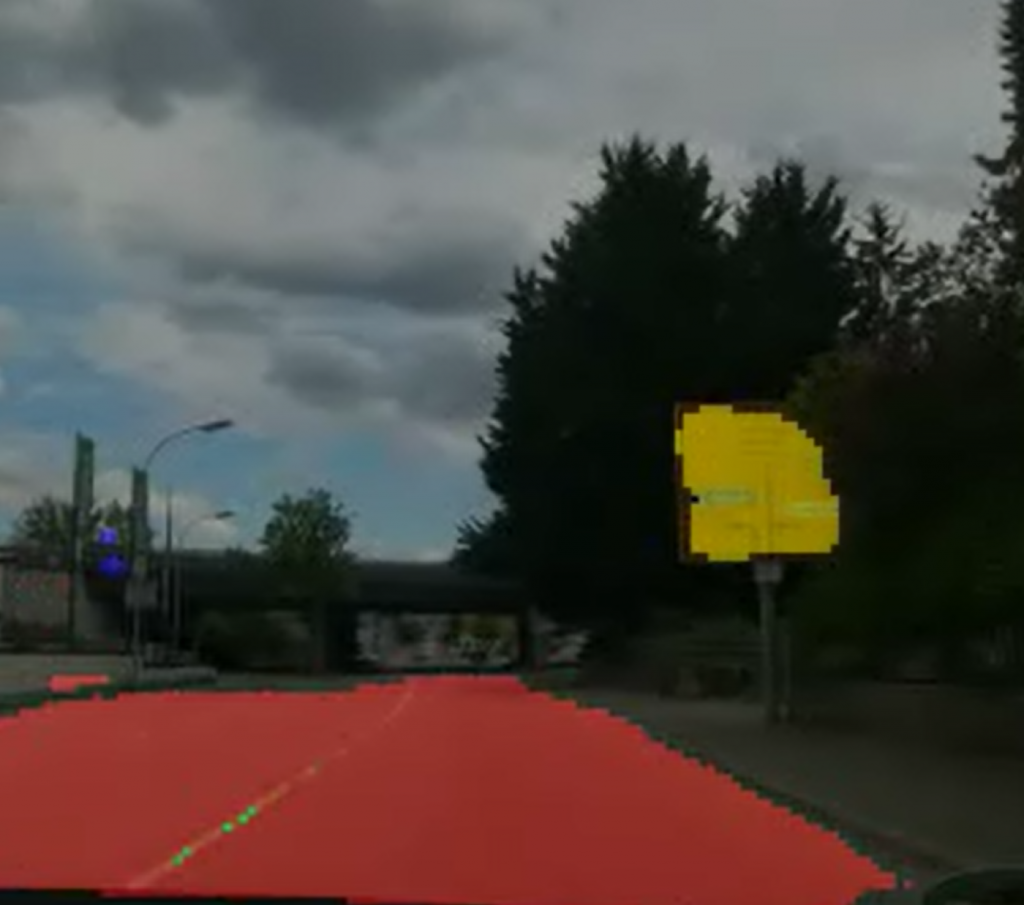
In Figure 5 you see a snapshot of the augmented video. The street is marked pretty well. You can even see how the sidewalk is not marked as a street. On the right side you find a traffic sign in yellow. The prediction works here good too. On the left side you find blue marking. The color blue categorizes cars. However there are no cars on the original image and therefore this is a misinterpretation. The street markings in green are not shown very well. In some parts of the augmented video they appear very strong, and in some parts you see only fragments, just like in Figure 5.
Overall we are very happy with the result of this project, considering that we have only labeled 250 images. We are convinced that we get better results as soon as we have more images for training. To overcome the problem we tried with data augmentation. So from the 250 images we created around 3000 images. We also randomly flipped the images horizontally in a code version, which was not discussed here.
We think that we have too much overfitting, which can only be solved with more training data. Due to the time limit, we had to restrict ourselves with fewer training data.
Acknowledgement
Special thanks to the class of Summer Semester 2020 Design Cyber Physical Systems providing the videos while driving and labeling the images for the training data used for the neural network. We appreciate this very much since this is a lot of effort.
Also special thanks to the University of Applied Science Albstadt-Sigmaringen for providing the infrastructure and the appliances to enable this class and this research.